Showing posts with label home projects. Show all posts

Monday, September 14, 2015

Allllllll-most Fall {and a recipe!}


Yesterday was a cool and breezy day full of little hints of autumn. Football was on the tv screen. BBE spent the whole afternoon prepping our fire pit and side yard for LadyBug's "end of summer" bonfire with friends. The Boss was working in the master bath, prepping for our big re-do (pictures coming soon) that starts on Tuesday. I had spent all Saturday afternoon filling the freezer with yummy casseroles for those weekday afternoons full of junior high football games and other Mommy taxi duties. Yes, fall is definitely in the air these days!

I was really looking for something easy to make for the family, given that I'd cooked for 4-5 hours straight on Saturday. I knew left-overs one!more!time! wouldn't cut it for the Gang, no matter that I felt wiped out. I also think I might be brewing a cold, so I was pretty motivated to simplify my day. This recipe was JUST the ticket! It's been going around the interwebs in a few different forms, with a few variations. It sounded really delish and easy to pull off so I gave it a whirl for The Gang this Sunday. It felt like just the right "introductory" fall meal. 

True to form, I couldn't just leave the recipe alone, so I'm sharing here what I did. Feel free to make it your own. It was indeed very easy and all The Gang members, including Shaggy and Miss A who joined us for Sunday dinner, gave it a huge thumbs up! I hope you all enjoy it as much as we did. The kids are eating it now, as I type this, for a delicious left-over lunch.

Slow Cooker Chicken and Dumplings

Ingredients:
 4 boneless, skinless chicken breast, in 1-2” chunks
   (or 6 skinless chicken thighs)
2 Tbsp. butter, chunked
1 medium onion, chopped
2 cans cream of chicken soup
1 can chicken broth
2 cubes chicken bouillon
1 12 oz. bag frozen mixed veggies, steamed and drained well
Cornstarch and cold water (if needed)
1 roll (10 per pkg) refrigerated biscuits, quartered
Flour to coat biscuits

Directions:
  1. Lightly spray a crock pot with baking spray. Place chicken in bottom of crock. Over the chicken, dump the butter, onion, soup, broth and bouillon.
  2. Cover crock pot and cook on low for 4-6 hours. If using frozen chicken, cook on high for same amount of time then reduce to low for the remaining time.
  3. Around the 3 or 4 hour mark, add steamed, drained veggies and stir well. Re-cover and allow to cook for an additional hour or two.
  4. While you are waiting for serving time, quarter the biscuits and toss them to coat in all-purpose flour.
  5. About 30-45 minutes before serving, thicken the mixture with cornstarch and cold water (shaken together well) if it’s too loose and soup-like.
  6. Drop flour-coated biscuits onto the top surface of the chicken mixture and cook with lid on for another 30 minutes. (For a single batch of these proportions, you might not need the whole roll of biscuits.) Do not stir!
  7. Once the biscuits are puffing and the broth is really bubbling well around them, it''s ready to serve. Be careful, those biscuits are HOT HOT HOT inside! Enjoy this hearty dish with your family!
I'd be interested in hearing what you did to change it up for your family's taste buds. I'm thinking that I might do a combo of white wine and chicken broth, with a dash or two of rosemary or dill added in with the liquids next time for a little added burst of flavor. There's just something about those flavors that really speaks "fall" to me.

Monday, February 2, 2015

DIY: Family Photo Wall

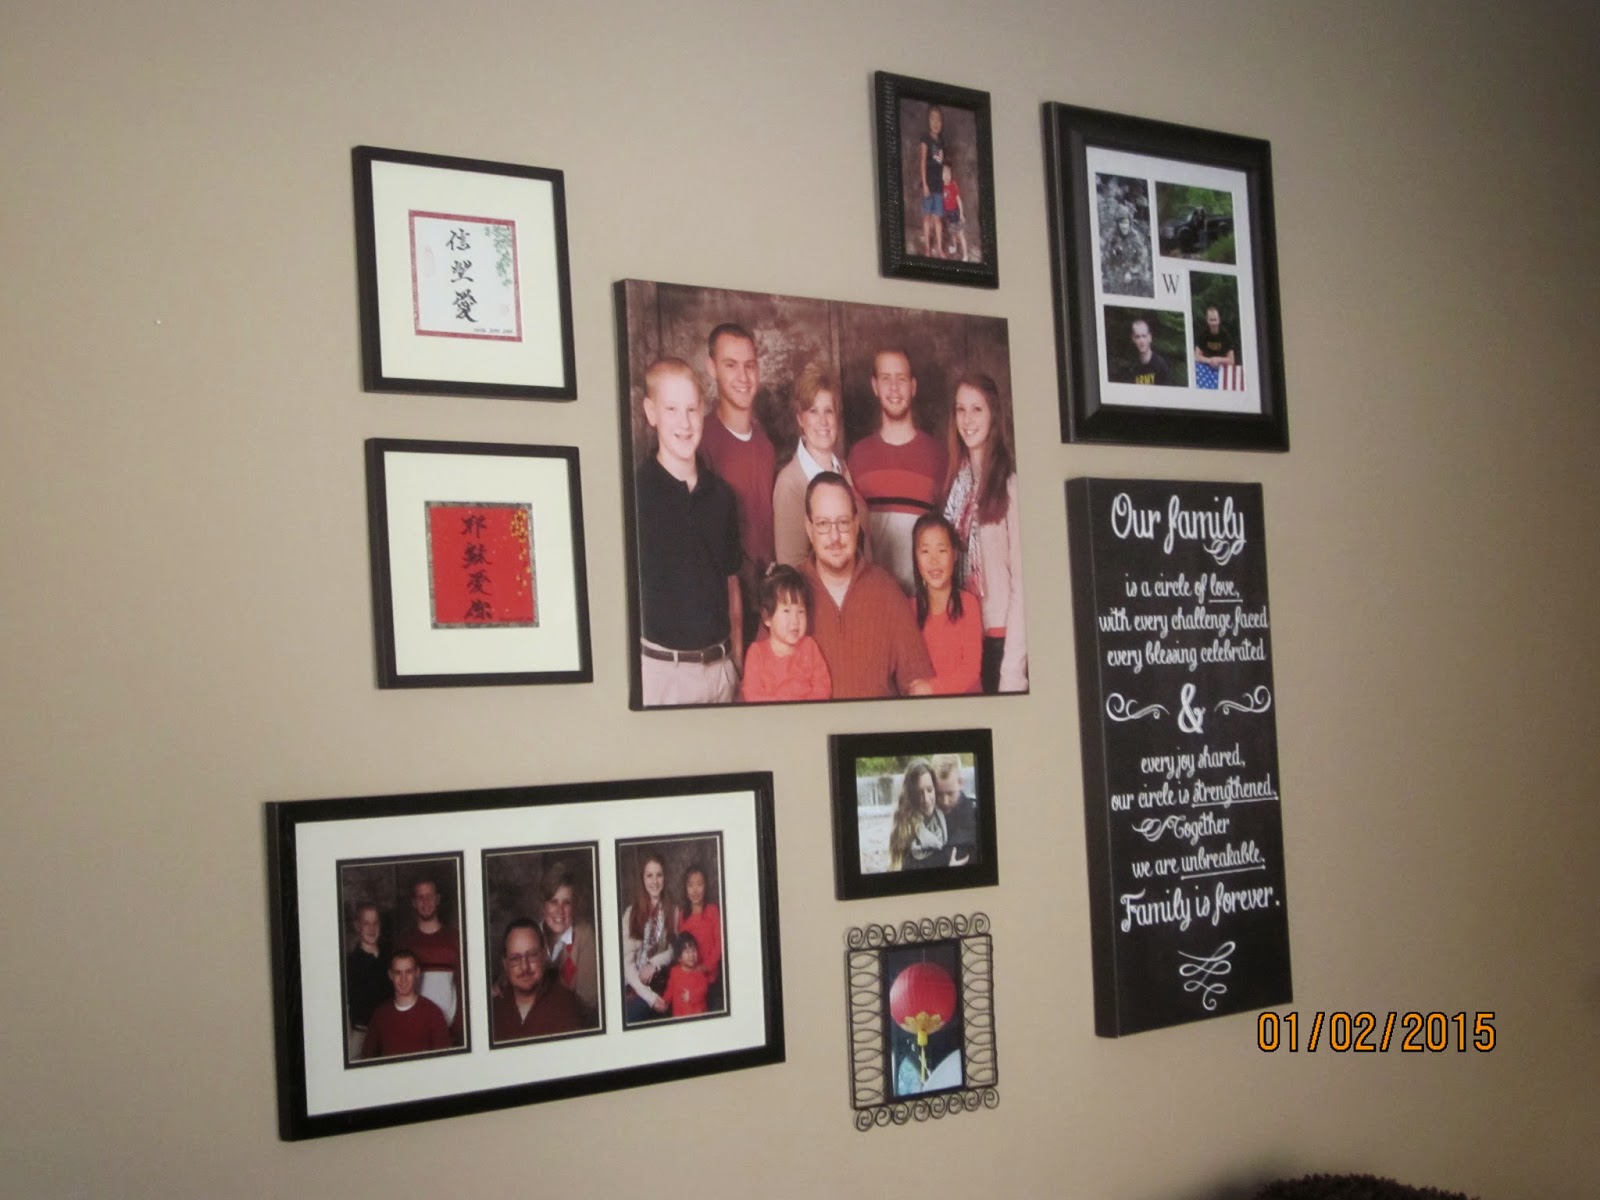
Last year, shortly after the holidays, I spied a cute re-vamp of a family's photo collection and tucked the idea away in my mind for future reference. Then in June, when The Boss lost his job and we had lots of projects lined up that were free or really inexpensive to fill some of his time, I pulled out the idea again from the recesses of my brain and got him going on it while I was using the days to sort through end-of-the-year school papers for each kid. He took a ton of frames from storage and various spots all over the house and spray-painted them all a high gloss black. This part of the project was totally free, as we had the paint (we always have glossy black spray paint, it's a staple!) and the frames were mostly sitting in storage unused and dusty. They turned out beautifully and it was a quick and easy way to create a unifying theme for the big project I had brewing in my head. I started a file folder of all of our most current favorite pictures of the Gang and started printing and tucking away other things I wanted to round out the project.

However July got really busy with some other pressing projects and then so many other issues took over (many of which I'll share in my coming series of gang member updates). Finally, during Christmas break, when The Boss was working from home and the bigger kids were free to watch the two little girls, he and I dug in and finished the project. Here's a peek, with a progression of the two days' worth of work.


This is how the big wall started out. I loved the simplicity of that large twig wreath over the couch but other members of the Gang made fun of it regularly. I moved it to the front living room and the proportions there are much better for the new space but some gang members still mock it. Sigh.


I had this family photo from November 2013 put on a large canvas, thanks to a great coupon code from my sister to Easy Canvas Prints. It was a new idea to me, though I'd seen others do it and I'm really pleased with the way it turned out. I am thinking of other projects now that I can do to update and freshen our walls around here!


This was the starting point, using our family photo as the anchor. We had previously placed all our favorite pictures into the newly sprayed black frames and tried really hard to get a good mix of shapes and sizes and orientations of the pictures. To give us a better perspective of what the final product would be, we laid the pictures out on the floor in front of the couch, arranging and re-arranging with help from LadyBug, who has an incredibly artistic eye. Her suggestions and tweaks were almost always "spot on!"


We just built on the anchor line and filled in with a combination of posed and candid shots. We also included some of our favorite artwork from our different trips to China that have meaning for us. But something was not quite right. It just felt, even with the couple pieces that we were still fitting into frames, that something was off-balance.


Baby BlueEyes came in from playing with the little girls and agreed that something was "missing." Right away, he said, "Hey, what about the 'Our Family' quote you have up in the dining room? That's black and white and it's a perfect size for the big empty space you can't quite fill."

Well, what do you know? He was right! It's a perfect fit for the space! Apparently, HE has a great eye for aesthetics as well. I'm still impressed by his suggestion!


Later that day, I headed down to our local crafting store and found the script-style letter "W" to add to the top of the arrangement. And there you have it! Our Family Photo Wall is done. Well, almost done. I've got about three or four other pictures I want to print and add. I'll just  move the picture of my handsome soldier boy up a little bit. But that's the beauty of this arrangement. We have a good amount of wall space still to work with AND we have things placed in a way that I know exactly what I can add and where.

I got so excited by all the work we finished that day that I took some extra time that weekend to find frames for all our updated cousin and extended friend & family pictures, too. I love having all the people we love best in pictures where the kids can see them and stay connected that way. Some of the annual Christmas cards we got were just stunning and lent themselves well to framing, too. There's a really inexpensive idea for you - at no extra charge! Take those Sh#tterfly cards of your sister's kids or your best friend's family and frame them! Youarewelcomeverymuch :)

I'm so pleased with the project and the whole thing cost us less than $100, canvas, mats and lettering included. Even when I go and print the three or four pictures I am working on, this will still come in under a hundred dollars. SO exciting to have current pictures of our gang - I seriously still find myself looking at the wall and sighing in happiness.


Friday, October 3, 2014

DIY {Card Catalog Upcycle}

At the end of August, I was out walking in our neighborhood with LadyBug and came across this gem sitting at the end of a drive-way, waiting for the trash service to come by. I hustled back to the house and asked The Boss to heft it home. I had a PLAN!


That afternoon, I posted a picture on my F@ceb00k wall and started a guessing game with my friends to see who might be able to "see" what it could become like I was seeing it in my head.  I guess I drove a couple friends crazy - I even got some private messages IMPLORING me to spill the beans to them! What fun my friends are!!!

The Boss had some sanding and glue-ing to do, as the laminate on the top and back were a little water-damaged. But in short order, he finished that step and turned it over to Baby BlueEyes to remove all the hardware and clean out the drawers. Like how he saved the tedious part for the kid?! Ha!!!


We had some dark primer in the basement. There was some skepticism about whether it was still good because we are pretty sure it was from painting our kitchen beadboard, back in 2010. It went on smoothly enough so I think we're good. All those little drawers standing up with their new primer remind me of little soldiers for some reason.


After The Boss did a TON of reading about creating a faux vintage look, he started by painting a base coat of the milk-chocolatey brown that we used in our dining room back in 2009.  Are you sensing the theme here? Yup. Upcycling on the cheap, using what we have on hand as much as possible. That's the goal!


The next coat was a thinned-out glaze of black with plenty of brush-strokes left to create a washed, worn kind of finish. This part is always hard for The Boss. He's such a perfectionist and the uneven, randomness of this look really stresses him out. NOT enough to hand the paintbrush over to me, but enough to make him doubt himself and second-guess my vision (that he already, admittedly, struggles to see the way I see it)


I am, oddly, NOT a perfectionist in these kinds of projects. I have a general ballpark in which I want the look to fall but if it's close, it's okay with me. I like the lack of symmetry and the quirks of hand-finished work. It is definitely NOT how I operate in most other areas of my life. Which might add to his stress, now that I think about it. 


Once a couple coats of a polyurethane were applied to seal and protect it from the wear and tear of all our big and little Gang members, it was ready for some after-market add-ons. The Boss spent almost an hour at L0we's the other day, texting pics of various leg styles and lengths to me. We settled on these and he spent his day off (from his part-time job at T@rg3t) finishing the legs to match the cabinet. Pretty impressive work, if you ask me!


He brought it in to the house and added the legs while Mei Mei looked on. Her first response when she saw it standing up was, "Oooooh, WOW!" My thoughts exactly, sweet girl! Look at how perfectly those legs blend in color, shape and size! And being the detail-nerd that I am, I'm also excited about how closely the knobs of the table match the turn-work on the legs. I know, NO ONE would notice that. But I do. And I love it!


What's even more perfect than the spot-on match is that the legs and the hardware to attach them are THE ONLY expenses we incurred to finish this project. I love me some cheap upcycling!!!!


The Boss and Mei Mei sat down and put all the brass hardware back into each drawer. And re-tacked each card-plate in the original holes. Well, to be more accurate, Mei Mei cheered daddy on and sang songs from Frozen while Daddy worked the hardware. Heh. 


The excitement was growing - I started cleaning the spot I planned to put it. Oh, man. There was a lot of dust back there... I think someone needs a re-definition of the chore card labelled "Dust Downstairs." Harumph...


Finally, it is DONE and in its new home. I could NOT possibly love it more. Really. It's so much better than I pictured it. It's absolutely my new favorite piece in the whole house.


Monday, July 28, 2014

Different is Good, Right?

I mentioned last week that this summer both LadyBug and The Boss have some extra time on their hands. Unfortunately, The Boss's recent "extra time" is the sort that none of us ever really want to embrace. Due to a departmental re-organization, he has been on "summer vacation" with the kids and I since early June. It's been quite a strange summer. Most weeks feel like an endless string of Saturdays around here, as The Boss's presence at home during a week day tend to "take us all down a notch or two" as far as routine is concerned. There are definite plus's to that environment for The Gang, especially on the heels of the very difficult and high tension winter we all just survived. I'm trying to stay focused on the plus's but I have to admit, it's not easy most days.

Ironically, the Thursday before he was released from his position, we were sitting on the couch, catching our breath at the end of a fairly "routine" day. I said something to the effect of, "Gosh, I feel like we are really settling into a good new groove. Like our new normal is here and is do-able. It's kinda nice, isn't it?"

I'm not superstitious or anything even close but golly, you can bet I'm never uttering words like THAT again around here. Sheesh.

Anyway, as I was saying, there are some "upsides" to having Daddy home for the summer. We got the gift of extraordinary quality time together as a family before we sent our boy off to Basic Training. There's never going to be another opportunity to have all 8 of us home quite like this again, now that both boys are launching off into the next stage of their grown-up lives.

~ Father's Day, June 2014 ~

~ Time to leave for Basic Training ~

Letting go of Dr. D was is really hard on both The Boss and I. But knowing that he was moving on to do something he has always dreamed of doing and seeing the excitement and joy in his eyes as he prepared to go really has made it easier. He was born to do this life he is pursuing and while we miss him terribly (like, "I hate seeing his empty bed, parked truck, and my empty couch" kind-of-terrible!), we are incredibly proud of the man he has become and the path he has chosen. More substantive letters would be nice, but hey, I know better than to expect a novel! :)

Oh, how I miss this afternoon sprawl!

The Boss was also able to finish the renovation of our deck in record time, since it didn't have to be squeezed in on weeknights and weekends only. We are so grateful that we had planned this project in advance - both because of the good timing for him to do it and the finances required to complete it. I'm tellin' ya, if you don't follow the Dave Ramsey plan for budgeting and managing your money, our gang is a PERFECT testimony of why you should! We don't do it perfectly but losing his income didn't not derail this project financially. And that's particularly awesome considering that we had demo'd the deck in early May when we had some help available to do so. Living without a deck and all that mess out there all summer would have been SUCH a huge and ugly problem for this pool lovin' gang.

Isn't it so inviting?
Come on by, the iced tea is cold and the pool is warm!

And of course, the "Honey Do" list has gotten a lot of attention since the deck was completed. Little niggling tasks that we have been meaning to "get around to," things that we have needed to repair, re-decorate, or refresh, and so on. Those smaller projects are all getting checked off the list as the days go on. He is a putter-er by nature so while he does miss the routine and structure of a work day (eh, who am I kidding, he doesn't miss it yet), he is really enjoying the time to do all this physical labor and spruce up the house and the yard.

Finally, I'm getting to tackle some projects that I've had on my mental To Do list for a long while now. I mean, Daddy is BETTER than a babysitter and he's free for afternoon swim parties. So I've tucked myself away a couple times to sort through mountains of school papers and projects from the last two school years. I purged my closet and dresser. I went through my jewelry box for the first time in probably 3 years. I even got to go through 4 bags of hand-me-downs within three days of receiving them - a record in this zoo lately! I've been sorting, streamlining, cleaning out, and yes, I'm back to writing. A slow and easy start, but I'm back.

The extra bonus of the swim time with Daddy is that Mei Mei is really acclimating to the pool quite well and coming along in leaps and bounds in her ability to trust Daddy and the big sibs in the water. AND she has slept through the night pretty much every single night for more than 3 weeks now. All that sleep has drastically improved her day-time behavior (and mine). AND her language is just exploding recently. She lightens the mood around here daily with the new things she is learning to say and the mimicry she pulls out at the funniest moments! We can't get over what a difference we are seeing in her, now that her surgeries are over and her body has come to its resting place of her new normal. It's really quite remarkable and I know The Boss has enjoyed being here to see the daily little transformations that are yielding a happier more settled and peaceful little Mei Mei.


Mei Mei turned THREE at the beginning of the summer.
Actually, the night before Dr. D left.
This is her cheesey smile on her new Kai Lan bike.


So. It's a different summer than we had imagined or planned for ourselves. And a very different kind of productivity than we had envisioned. But we're finding the new groove to it and I'm working on appreciating the time we have as a family as much as I can without worrying too much about the job leads and paychecks and insurance issues. THAT kind of worry messes with my momentum in serious ways. I'm finding it to be an hourly choice to alternatively focus my attention. It's not easy and while I do enjoy that he and I are getting these tasks done with unusual (for us) timing and focus, I do have to work to not camp in the worry-tent. I guess I can be thankful for that - it's keeping me sharp and on my spiritual knees at the very least.

It's different. I'm working to find the good in this kind of different.


Thursday, July 24, 2014

DIY: Shabby Chic Photo Gallery

LadyBug and I have been working (albeit at a decrepit, arthritic snail's pace, I admit) on some inexpensive re-do's in her room to update it and to reflect more of her love of all things vintage. Last fall, she and The Boss turned a solid white, kind of boring bookshelf into great multi-purpose storage for her room.

The first pass of sanding it down.

The finished product.

Pretty, functional and a loooong way toward finishing off her desired look. But we both knew we just weren't done yet. Curtains to replace her former little-girl-esque sheers are STILL not hung. Updated wall hangings have been added slowly over the last 8 months. Storage that is both pretty and functional had already been tackled last summer. I love watching her sense of style unfold and taking our time with this room is proving to be a great way to get to know her better.

There was a huge blank space on the wall above her bed that we just kept meaning to get to. Now that summer is here and both she and The Boss have some extra time on their hands, I put an idea out there for her to consider. She got on board really quickly and we got down to it. I had first seen a similar project using big huge French doors and black and white photos in a DIY design magazines and used the idea of it to inspire LadyBug's creativity after she and I saw something similar on our new favorite DIY show.

My great friend came through with FREE frames to get us going.

What a cutie pie!!!!

After The Boss safely removed all the glass and cleaned up the splinters,
LadyBug painted them both with a light coat of creamy off-white latex
that we already had in storage.
Then LadyBug sanded very strategically and sparingly
to achieve that vintage look she loves.

Shaggy's girlfriend came up for the afternoon
to join in the creative process.
Incidentally, she has her own blog. You should check it out!
Your tummy will thank me, I promise.

The girls flipped the dried and sanded frames over
and used a staple gun to attach chicken wire to the back.

Even BabyBlue Eyes got in on the action.
They used hammers to sink a few of the stubborn staples
and to nestle the ends of the wire more tightly against the frames.

These girls aren't just a pair of pretty faces, my friends!

The Boss hung the frames on the empty wall.

And LadyBug got busy with the clothespins
and cute pics of her BFF's that she's been saving for a while now.
Once she's home from her youth retreat, I'm pretty sure that space
will fill up fast with quotes, more pictures, and other momentos.
I can't wait!

I love the finished look.
It completes that space so perfectly
and is so complementary to the already-existing
cottage-y feel her room has.

BEST of all? This great project only cost us
LESS THAN $20 with materials to spare!!

Now if I could just figure out the curtain dilemma.
But that's another post for another day, my friends.
SO. What crafty things are you doing this summer? I'd love to hear about it in the comments. Feel free to even leave a link and I'll come on by.

Thursday, January 23, 2014

Retiring the Old Gal

Nope, not me. I mean, I'm old. And feeling older by the day. But no, I'm sticking around for a while still. I'm sure you are all relieved.

We've officially retired our rocking chair. It might not seem like a big deal to many of you. But this sentimental mom is remembering the past 14 years of snuggles, middle-of-the-night feedings, spit up and more. All in this $100 Toys-R-Us clearance bargain I scored when I was expecting LadyBug. Who is now 14. Sigh. Four.Teen. Again, with the sigh. But it was long past time for a change. A quiet, smooth-riding change. This late 90's model has seen better days. Its contributions to the noise quotient in this house have exceeded Momma's limits.


I've mentioned before that I have purposed to cherish and use Mei Mei's naps and night time routines for all that they can be. But since Mei Mei's surgery, we've really been struggling with some hard night time issues. Sleep irregularities and deprivation have taken a toll on us all. She's taking MUCH longer to settle for both nap and night time. And that longer time has translated into raucous, grating, obnoxious squeaking and creaking from this old rocking chair. No amount of WD-40 has consistently worked. No tightening of bolts or screws has stood up against the steady rhythm of comfort that I have had to engage in twice a day for my girl. And the terrible noises have made me tense. Oh, so tense. Which, of course, has NOT contributed ummmm, positively, shall we say, to the process of soothing and gentling my girl to her rest. Rest that she desperately needs to feel in order to heal, both physically and emotionally.

So I bit the bullet and started shopping around a bit. True to form, the glider rockers that I really wanted to purchase were ridiculously, insanely crazy expensive. You know the ones that look like lovely recliners and "real" furniture for the family room? Yeah. Those are really gorgeous. But out of The Gang's budget by hundreds of dollars!

I wanted something that would do a great job playing its part in a quiet and peace-filled bed time routine but that also would fit seamlessly into the decor of the downstairs of the house when our rocking-Mei Mei-to-sleep-days are over (sigh, sob). I found a great deal on W@yF@ir, and scored a good price on a special sale day. A couple clicks and my new chair arrived on Monday.


In the process, I may have developed a teensy tiny addiction to their website. And to their giveaways. Maybe.

OH! ALL! THAT! FURNITURE!
OH! ALL THAT REDECORATING I'M DOING IN MY HEAD!

Mei Mei isn't too sure how she feels about it yet. She keeps patting it and saying "Soff, Soff," but she isn't totally embracing it yet. She kind of watches the cushion warily while I'm settling us in. But me? Heh. I might take my next nap there. It's quiet. And soft. And quiet. Oh. SO. Quiet.


Friday, November 15, 2013

Labeling

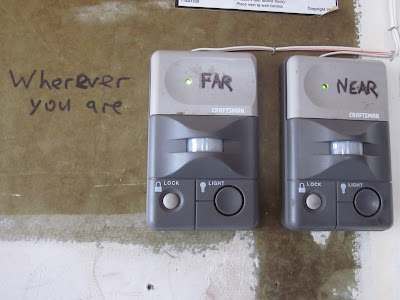
Several weeks after we moved into this house, The Boss (who was very excited to have our first ever 2-car garage) felt the need to label our wall-mounted garage door openers.


Pretty self-explanatory but I'm still not entirely sure why The Boss felt the need for the marking. I mean, I'm pretty sure even in the midst of this Gang's craziest chaos, we could likely remember which opener works for which door.

I will say that I can empathize. I am a huge fan of labeling. It's just that I prefer to keep my labeling for things like oats, lentils, and all the different baking chips I store in my pantry. And I prefer my handy-dandy Dymo Letra Tag QX50. (It's awesome! I can change font size AND weight, use white OR clear labels, and so much! more!) But I digress....

Anyhoo, apparently Shaggy has long felt that the labeling system for our wall-mounted garage door openers was lacking something. And apparently, now that he's a full-fledged adult {ahem, snicker, snort!}, he felt it was time to remedy that lack.


I love that kid!

Wednesday, September 25, 2013

Managing the Seasonal Wardrobe Project

I'm so excited that fall is finally here. The smell of pumpkin spice coffee is on the breezes flowing through our house this week, soothing the clutter and mess that changing out the seasonal clothing always ruffles up. It's a several-days process here, what with 6 kids and all. Because of that, I (long ago!) streamlined the job to a twice a year change-out.  We lump Spring/Summer together and Fall/Winter are paired. It means waiting a tad longer into the start of the school year for "new clothes" but with our early years of home-schooling, I never developed the "school shopping" habit of late summer anyway. With this system, I'm only buying clothing as it is needed, and not in one fell swoop unless there's a special occasion like a wedding or such. That change of focus has saved us a ton of money over the years. (aaaand, BONUS! I get to pitch all the "Back to School" flyers that flood the mailbox beginning in mid-July!)

This year, I'm enjoying the fact that at least 2 of the 6 kids are quite capable of pulling out all their summer gear, trying on the prospective fall clothing and making up a list of their "needs" for me without too much coaxing and prodding. Two of them need me to pretty much do the whole project FOR them. And the other 2 tend to wear the same "uniform" of shorts, jeans, and tees all year around. Which in and of itself presents a whole 'nuther project that I'm putting off till, well, when I have to face their closets in search of something for family photos.

Even saying that, "...family photos" is enough to make me cringe... anyone else get that? Coordinating dates for 8 of us plus one photographer friend. Coordinating clothing so that we at least look like we INTENDED to be photographed together. Coordinating the clothing so that we don't clash and maybe even, well, coordinate. OY. Sigh.

Oh, wait. Where was I? Fall clothes. Oh yeah.  I know I'm not the only momma who dreads this project. And I've had enough younger mommas ask how I manage it without breaking the bank each year that I figured it would be blog-worthy. So I'm posting these pics from our fall clothing project and sharing some organizing tips that I've picked up along the way of managing this task for my gang. AND I'm hoping to hold myself a little accountable to get it done and cleared off my To Do list by the end of the week. Anyone with me on that one?!


 There are pockets of the unfinished project all over
the house, upstairs and downstairs.
Normally, this stresses me out. But this year,
I'm drinking my Pumpkin Spice coffee and breathing through it.

Each kid has a Fall/Winter bin in their size, and a Spring/Summer bin. When the weather turns cooler, I have them haul their two bins up from storage and begin the process of weeding out the summer pieces. Generally speaking, we make three piles: return to storage, discard, and donate. In Baby BlueEyes' case, anything that is too small (or will be too small by next summer), immediately goes either to discard or donate. He's our last boy-o and there's no need to return things to storage for him. (YAY!) For the girls and the bigger boys, the "return to storage" pile can only be things that they KNOW they can wear again next year OR things that they know will not go out of "style" by the time the younger sibs get to them. I'm always excited when my "discard" and "donate" piles are big enough to fill a garbage bag or two. Truthfully, if I could pare things down to just one bin per size, holding both seasons of clothing alternately, I would. But these darned kids keep growing and those bigger clothes just don't work that way.

Having a well organized and labeled system for our clothing storage has been a lifesaver for me. I used to store them in whatever plastic bags and/or cardboard boxes that I could salvage but that got messy and pricey, too. Investing in these heavy plastic totes has really allowed us to protect the majority of stored clothing from dry rot, moisture damage, and other environmental issues.Therefore, we're saving money. And I'm all about THAT! Living in three different homes with three different storage spaces, I learned that lesson the hard way one too many times.

At this house, the bins are all stacked and stored in the basement.
An occasional hurricane forces my hand to purge and sort more judiciously than
the twice-yearly projects require.

As you can imagine, as Mei Mei is outgrowing her clothing (yay, she's gained about 4.5 lbs since April!), I'm trying to be pretty quick about passing it on and moving it out. It's a great feeling and I'm surprised at myself - I'm not even feeling sentimental about clearing things out. In fact, by the end of this week, I hope to have nothing smaller than 18 month clothing left in the bins and I'm excited by that!


When the summer clothes are sorted and stored or bagged up and the fall clothing is put away in drawers and closets, I have each kid give me a list of the "needs" and the "wants" they have for rounding out their wardrobes. Again, as they have gotten older the lists are easier to generate and in the boys' case, these lists are shorter and more streamlined. As you can imagine, my fashionista LadyBug has quite a few editions of her list before she hands me her "final copy." I have her help me plan out the list for the little girls, too. It's a great way to help LB think strategically at something she loves. Shhhhh, don't tell her but her artsy self has a hard time with planning and plotting so it's a sneaky way of teaching her some good life skills. She also helps me pare down the wardrobes for the little sisters by pulling out duplicates or past trends that I don't "see" and that "horrify" her. Heh!

I run through my clothing with the same system and check in with The Boss for his needs at this point, too. Then each person's list gets transferred to an index card that I store in my handy dandy envelope system. When I'm out running errands or I see a bargain on my online yard sale sites, I can reference the lists quickly and easily AND have an up-to-the-moment idea of how the clothing cash is holding up. I pretty much take the envelopes with me everywhere I go, especially now that it's just me and Mei Mei all day long. It's so much easier to shop and run errands with just one little sweetie and NO half-day kindergarten routine to work around.

When the needs and even some of the wants on a card are taken care of, I toss it and usually by November I am done rounding out the kids' fall/winter wardrobes. I love it when it happens earlier but it's been a while since I finished before Thanksgiving, between budget constraints and regular crazy-life pace, so I try not to stress and I DON'T give in to the temptation to just do it all and pay the budget back later. A little prioritizing, a little layering, and a lot of patience goes a long way. For all of us!

There you have it. Managing the seasonal wardrobes for 6 kids and 2 adults. It's not nearly as daunting as it sounds and with all the much-appreciated hand-me-downs that the kids recive from friends and family, it's actually kind of festive for the few days it takes to wrap it all up. Well, festive for the girls anyway! To the boys, it's just a project to be endured. And for Momma? It's a chance to clear out, clean up, and re-organize the rooms (including my own!) that got neglected a bit during our lazy hazy days of summer. That alone is reason enough to make me take a big gulp of that Pumpkin Spice goodness and breathe deeply of the fresh crisp air!

How about you? What tips and tricks have you discovered along the way for this big project? 

Tuesday, July 23, 2013

DIY: Shabby Chic Storage

I have a plethora of memories to document here and really no time or mental clarity to commit myself to capturing my thoughts, editing those thoughts, and getting them into a regular posting schedule again. So I'm starting out the gate again slowly... bear with me as this one really has nothing to do with the many milestones Mei Mei is tackling almost daily. Or the adjustment to our new normal that I'm still working through carefully and slowly. Instead, here's a peek at a DIY project that The Boss and I threw together for LadyBug.

Several months ago, I found this small dresser by the side of the road. Dr. D had asked us to be on the look out for "project pieces" that he could clean up, fix up and re-sell. He loves working with his hands and the chance to make something beautiful out of others' cast-offs appeals to him. So I loaded it into the van with Shaggy's help and brought it home.


However, the bones of the dresser were pretty rotted and warped, so he decided to trash it. I asked him to save the drawers and clean them up for me. I had seen an idea in a design magazine a long time ago and then again when my sister did something similar for her boys' rooms. I asked The Boss to make a help me make it a reality for LadyBug's room as she is in a bit of a "re-do" mood and we're trying to accommodate her design gene without breaking the bank.

I asked The Boss to pick up some casters, while I shopped for the knobs and contact paper.


Then it only took a little bit of sandpaper, some clear coat varnish.
And VOILA!
Just like that, LadyBug has beautiful
new storage made from these old drawers.


I wish I was "together" enough these days to give you the tally of costs
for this little DIY. But alas, I'm just glad it's done and it's one less thing
for me (and The Boss) to think about for now.
You'll have to trust me when I say it was done "on the cheap!"

What summer DIY's do you have goin' on there? Share in the comments.
I'm always looking for inspiration and ideas.